Where you sit on the dome, how you orient your pelvis, and what changes when you remove your hands from the floor — a practical guide to the BOSU V-sit from first hold to loaded variations.
The floor V-sit is already a demanding exercise. You balance on your sit bones, lean your torso back, lift your legs, and hold the shape while your rectus abdominis and hip flexors fight gravity from both ends. It works. But the moment you move that same position onto the dome of a BOSU ball, the exercise changes in ways that have nothing to do with added difficulty for its own sake — and everything to do with what happens underneath you before your feet ever leave the ground.
The dome is curved. It compresses under your weight. It shifts when your balance shifts. These are not abstract problems. They change where your pelvis sits, how your trunk stabilizes, and which muscles end up doing the bulk of the work. A BOSU V-sit set up well trains isometric trunk flexion, hip-flexor endurance, and resistance to extension, lateral tilt, and rotation. A BOSU V-sit set up poorly becomes a hip flexor death grip with a rounded lower back — harder in all the wrong ways.
This article covers the setup, the mechanics, and the progression of the BOSU V-sit from first contact with the dome to loaded variations — with enough detail that you can feel the difference between doing it right and muscling through it wrong.
BOSU V-Sit vs. V-Ups vs. Floor V-Sit
Three exercises share a name fragment and a rough shape, and the confusion between them matters because they train differently.
The floor V-sit is an isometric hold. You sit on a flat surface, lean back, lift your legs, and hold the V. The surface is rigid and stable. Your balance challenge is minimal — you manage the position mostly through core and hip flexor endurance.
The BOSU V-sit is the same isometric hold performed while seated on the dome of a BOSU ball (dome side up). The curved, compliant surface adds a balance and proprioceptive layer: your trunk must make constant small corrections to keep you from rolling off. The muscles doing the work are the same, but the stabilizers — particularly the muscles resisting lateral tilt and rotation — likely work harder to maintain the position.
BOSU V-ups (sometimes called BOSU V-sit-ups) are dynamic. You start from a reclined position on the dome and repeatedly fold your torso and legs toward each other, then extend back. This is a repetition-based exercise. It trains concentric and eccentric control through a range of motion, whereas the V-sit is a hold that trains isometric endurance and stability.

If you are searching for the hold — the sustained V shape on the dome — you are looking for the BOSU V-sit, and this article covers that exercise.
What the BOSU V-Sit Trains
The primary muscles in a BOSU V-sit are the rectus abdominis and the hip flexors — specifically the iliopsoas and rectus femoris. The rectus abdominis maintains the trunk in flexion against gravity (preventing you from falling backward). The hip flexors hold the legs elevated.
The secondary muscles are where the BOSU distinguishes itself from the floor version. The obliques — both internal and external — work as anti-rotation stabilizers because the dome can tilt in any direction, and the trunk has to resist that tilt. The transversus abdominis provides deep stabilization beneath the more superficial muscles. The erector spinae co-contract to help stabilize the lumbar spine — not as prime movers, but as part of the trunk’s bracing response. If the legs are held straight, the quadriceps also work isometrically to maintain knee extension.
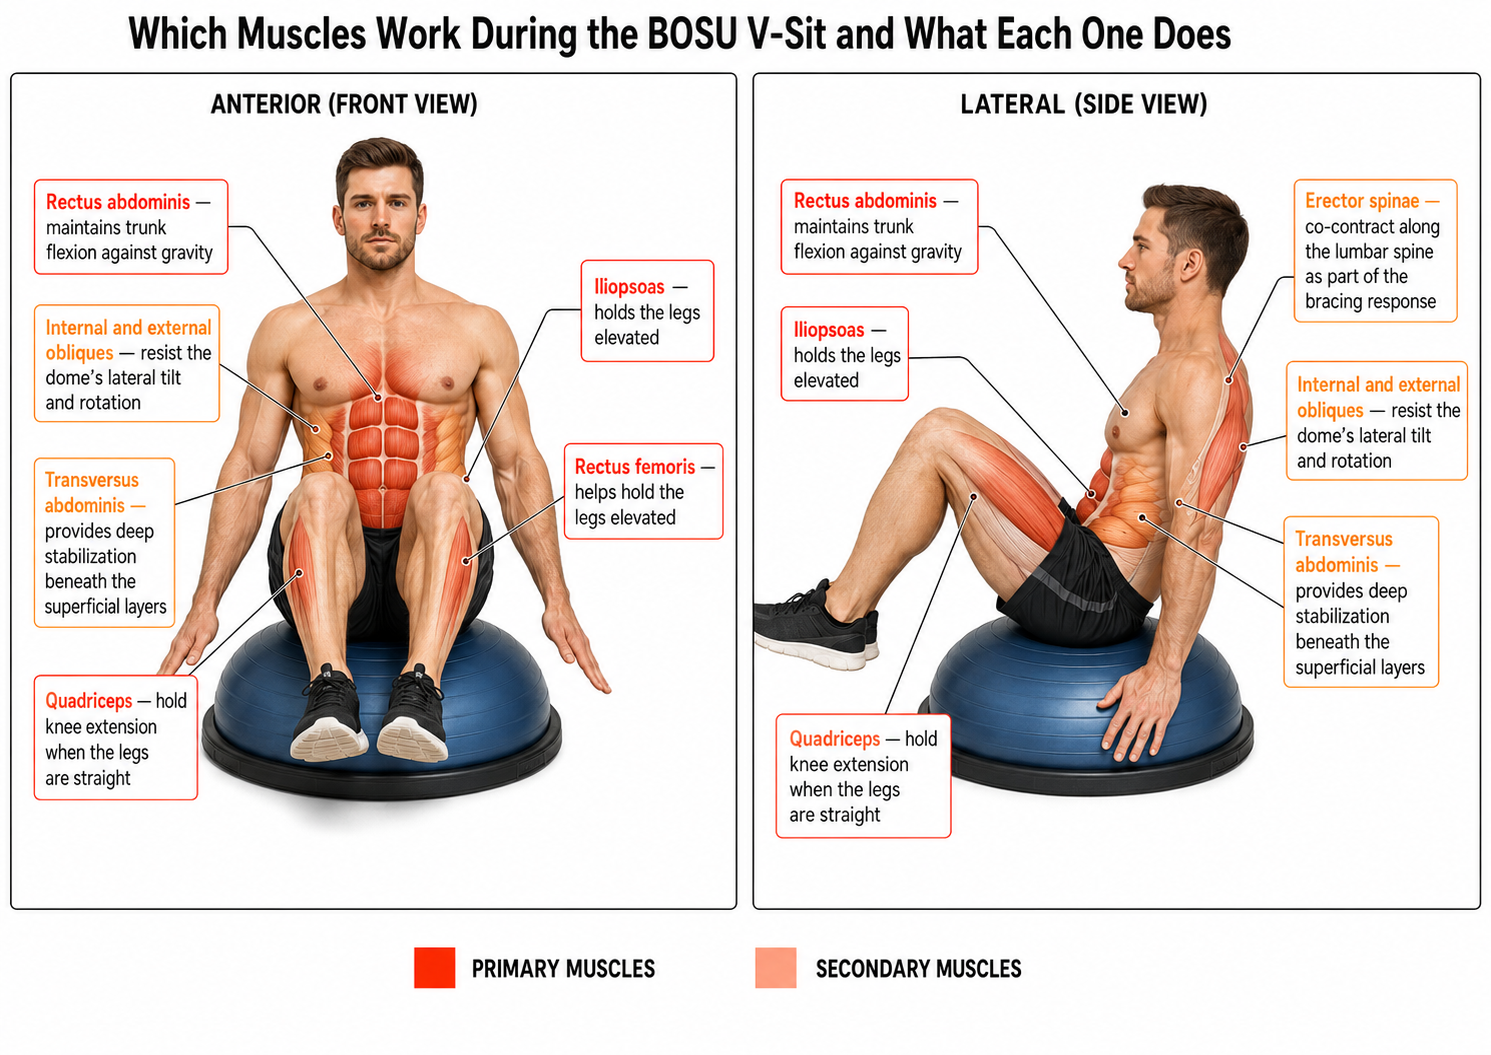
The dome’s lateral instability likely increases the demand on the obliques and transversus abdominis compared to the floor version, because the trunk must resist tilting in multiple directions simultaneously. That said, the research picture on oblique response to unstable surfaces is mixed. A 2014 study in the Journal of Strength and Conditioning Research found that during sit-ups — a different exercise, with the BOSU placed under the low back rather than sat upon — external oblique activation actually decreased by 22–24% under bodyweight conditions, while rectus abdominis activation increased by 21–24% when external resistance was added. The study was conducted on 24 men, and its findings inform the general principle that where a BOSU is placed relative to the body matters for muscle activation, though the specific effects depend on the exercise and loading condition. Direct BOSU V-sit EMG evidence appears limited.
What a Curved Surface Does to Your Base of Support
On the floor, your sit bones rest on a flat, rigid surface. The base of support is wide and predictable. You know where you are. Your trunk muscles do not need to work hard just to keep you from falling sideways.
On the dome, three things change at once.
First, the surface is curved. Your sit bones no longer rest on a flat plane — they rest on a convex shape that narrows the effective base of support. Small shifts in weight that would be absorbed by a flat floor now create a rolling moment. The dome wants to tip you.
Second, the surface is compliant. It compresses under your weight, and the amount of compression changes as you shift. This means the dome’s shape under you is not fixed — it responds to your position, and you respond to it, in a continuous feedback loop. Your trunk muscles have to make constant micro-corrections that a flat floor never demands.
Third, the dome’s convex curvature may encourage the pelvis toward slight posterior tilt — a reasonable biomechanical inference when a convex surface sits under the ischial tuberosities, though this effect has not been directly measured on a BOSU. If it does occur, it would shorten the hip flexors’ working range and may shift more of the trunk-flexion demand onto the rectus abdominis. This is worth paying attention to during the exercise: if you notice your lower back flattening more on the dome than it does on the floor, the dome’s shape may be contributing.
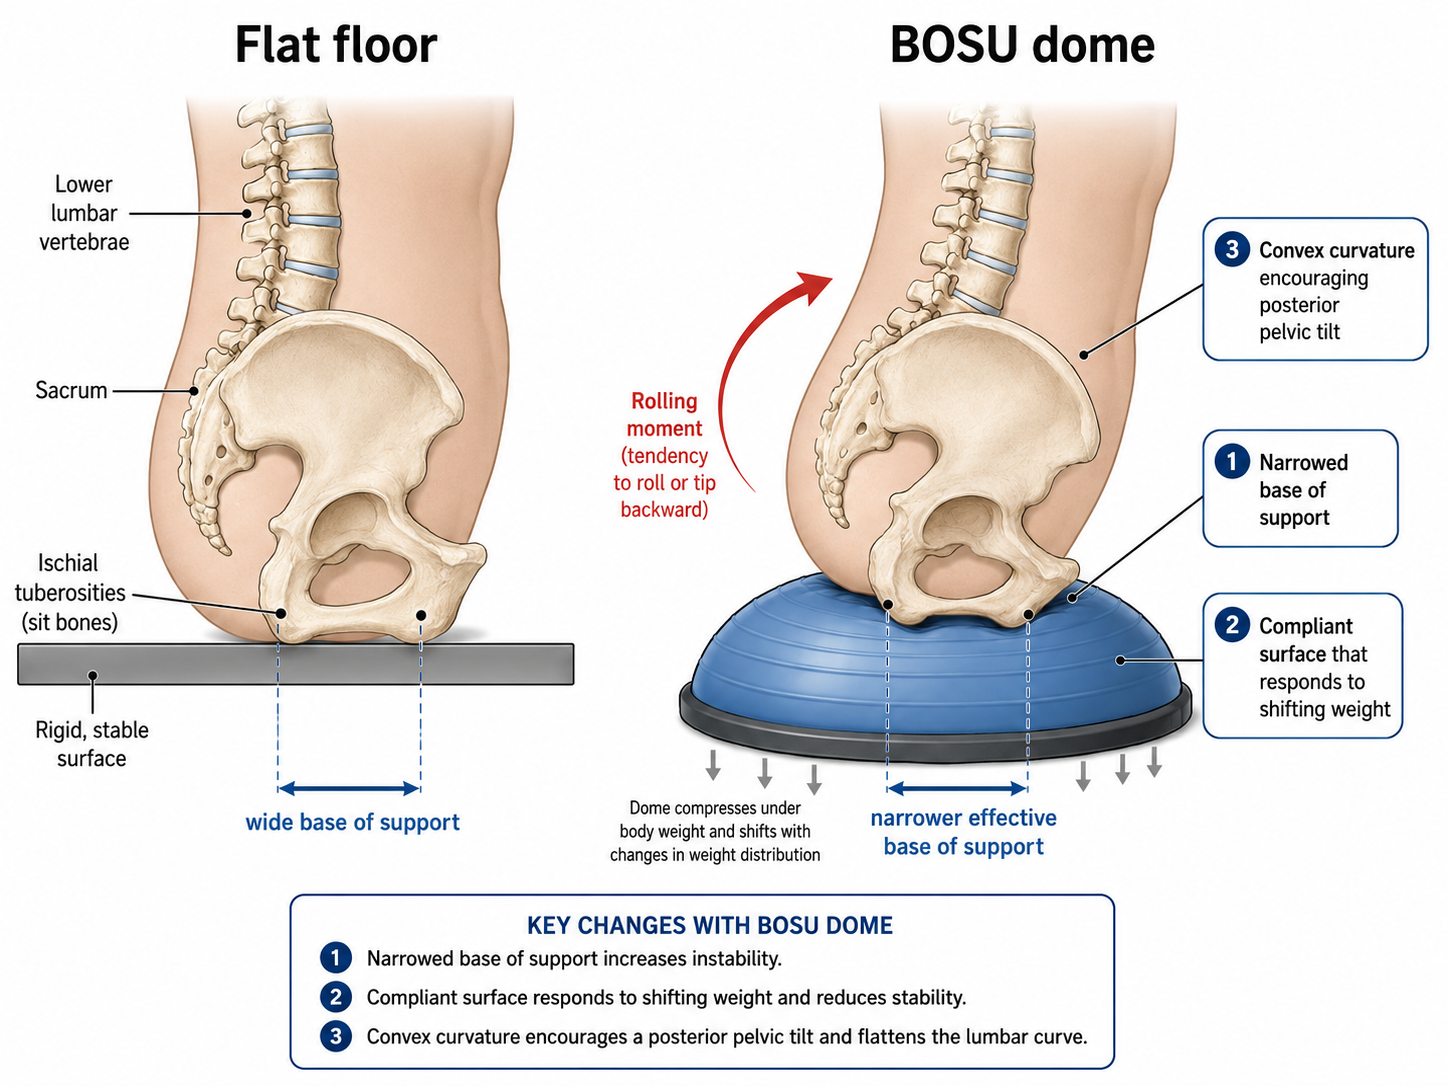
None of this makes the BOSU V-sit “better” than the floor version. It makes it different — and the difference lives in the setup, not in the hold.
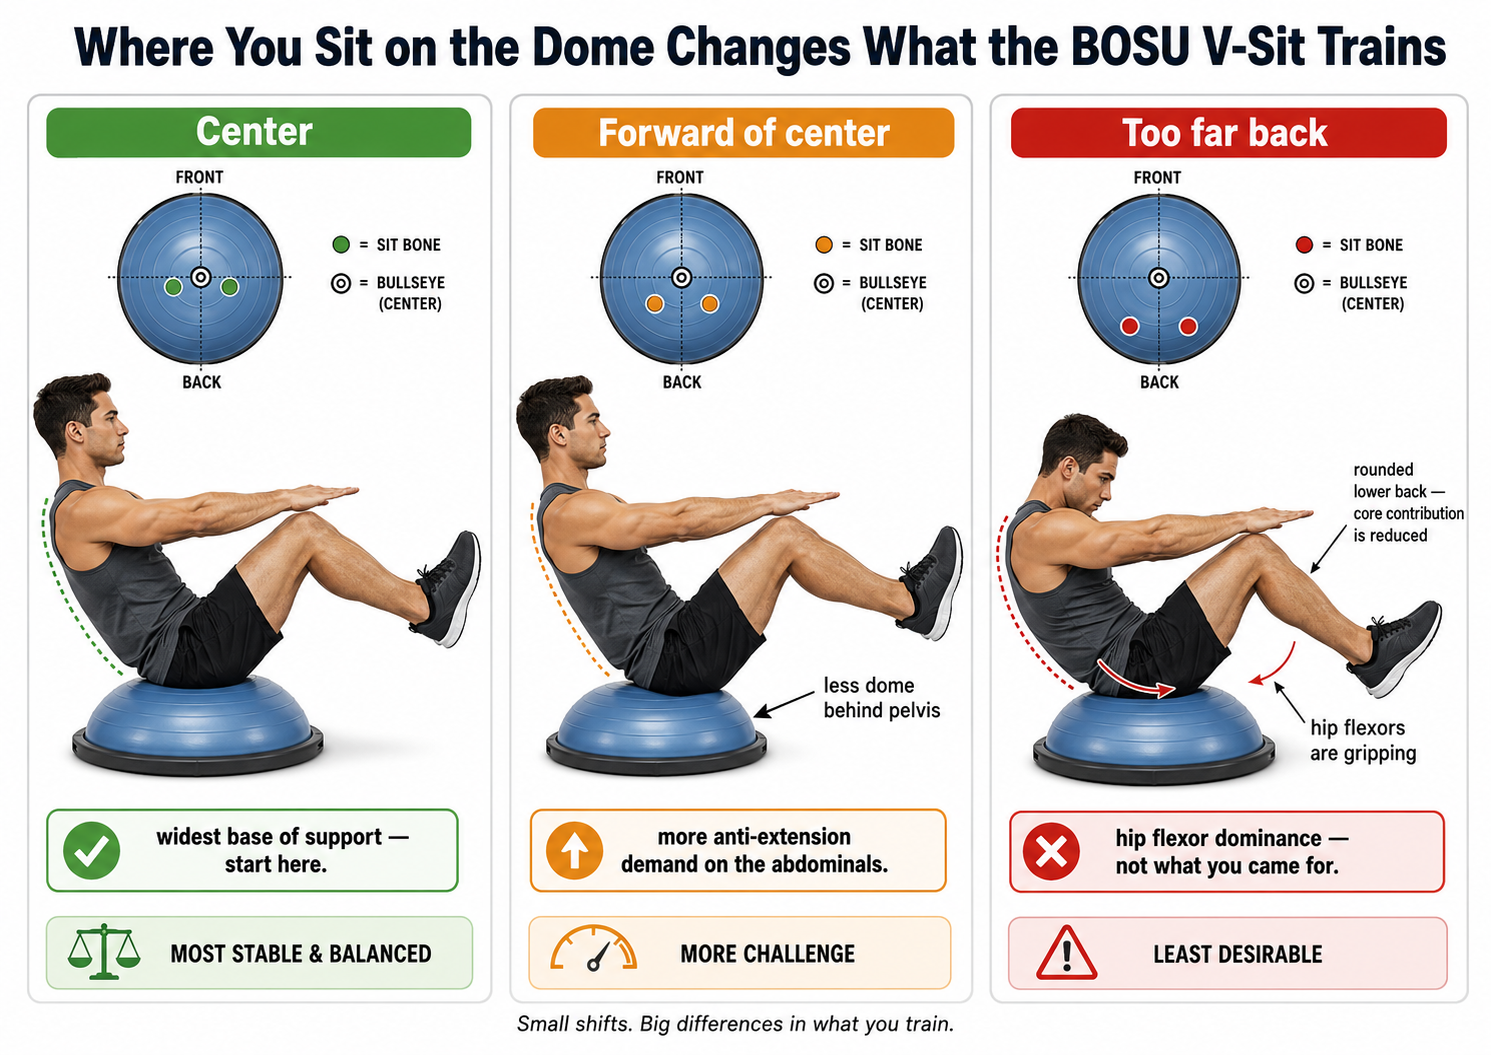
Two Inches on the Dome, Two Different Exercises
Where you place your sit bones on the dome is one of the most important setup variables in the BOSU V-sit, and it is the one almost never discussed. Two inches forward or back changes what the exercise trains.
Center of the dome — sitting with the ischial tuberosities roughly over the bullseye — gives you the widest base of support available on the dome. This is the most stable starting position and the right place to learn the exercise. Difficulty is moderate. This position usually feels closest to the floor V-sit in terms of how the effort distributes.
Forward of center — shifting your seat an inch or two toward the front edge of the dome — reduces the base of support behind your pelvis. There is less dome behind you to catch you if you tip backward, so the abdominals have to work harder to prevent that backward tipping. This is a legitimate progression. It increases the anti-extension demand on the rectus abdominis without adding load or changing the leg position.
Too far back is where the exercise tends to break down. When the pelvis slides toward the rear of the dome, the person loses the mechanical advantage of sitting on top of the curve and starts gripping with the hip flexors to stay on. The lower back rounds excessively. The torso collapses. What was an abdominal stability exercise becomes more of a hip flexor endurance hold — harder, but not in a way that trains what you came for.
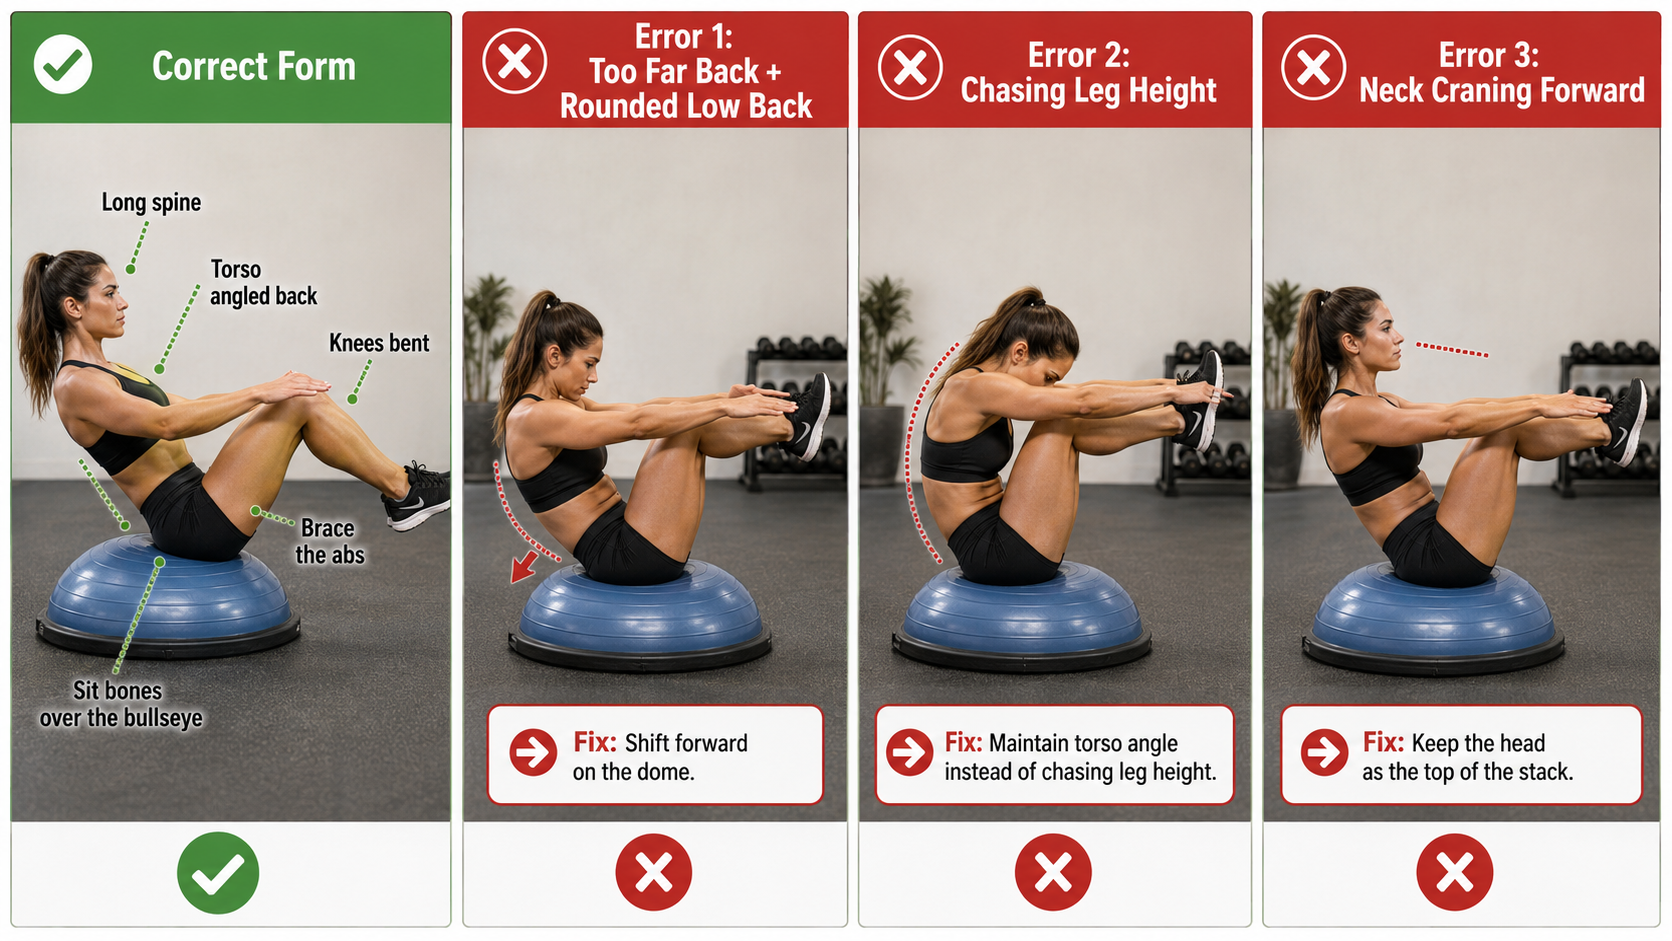
The practical cue: the bullseye of the dome should sit roughly under your mid-pelvis, not under your tailbone. If you feel your lower back rounding hard and your hip flexors burning before your abs engage, you are too far back.
How to Set Up and Hold the BOSU V-Sit
Place the BOSU dome side up on a non-slip surface with clear space around it in case you lose balance.
Sit on the dome. Place your sit bones over or just forward of the bullseye. Plant both feet on the floor in front of you, knees bent. Place your hands behind you on the dome for support. Before anything moves, set your spine: find a position between fully upright and slightly leaned back where you feel your abdominals engage. This is your torso angle. Do not let the dome push you into a slouch.
Brace. Draw your ribcage down toward your pelvis — not by rounding your back, but by engaging your abdominals as if you were about to absorb a light push from the front. Breathe into this brace. The brace should not require you to hold your breath — if it does, you are bracing too hard for the exercise.
The key to breathing while braced is expanding your ribcage laterally rather than lifting your chest or pushing your belly out. As you inhale, let the lower ribs widen sideways while keeping the abdominal wall firm. As you exhale, the ribs draw back together — the core tension stays, the air moves. A rhythm of roughly three to four seconds in, three to four seconds out gives most people a sustainable cadence during the hold. Practice this breathing pattern seated on the dome with feet still on the floor before adding the leg lift. If the breathing falls apart when you add the V-sit, the hold is too advanced for your current level.
Lift. With hands still behind you on the dome, lift one foot off the floor. Hold it for a moment. If you are stable, lift the second foot. Bring both knees toward your chest, maintaining your torso angle — the common error here is letting the torso drop toward the legs rather than holding the angle and lifting the legs to it.
Choose your leg position. Bent knees (shins roughly parallel to the floor) is the starting position. Extending the legs increases the lever arm and makes the exercise significantly harder. Start bent. Earn straight. Within the bent-knee position, leg height also matters: holding the knees higher (closer to the chest) shortens the lever and makes balance the primary challenge, while lowering the legs (feet closer to the floor) lengthens the lever and increases the demand on the hip flexors. Adjust the angle to match the progression step you are working at — the goal is a position you can hold with form intact, not the most dramatic-looking V you can create.
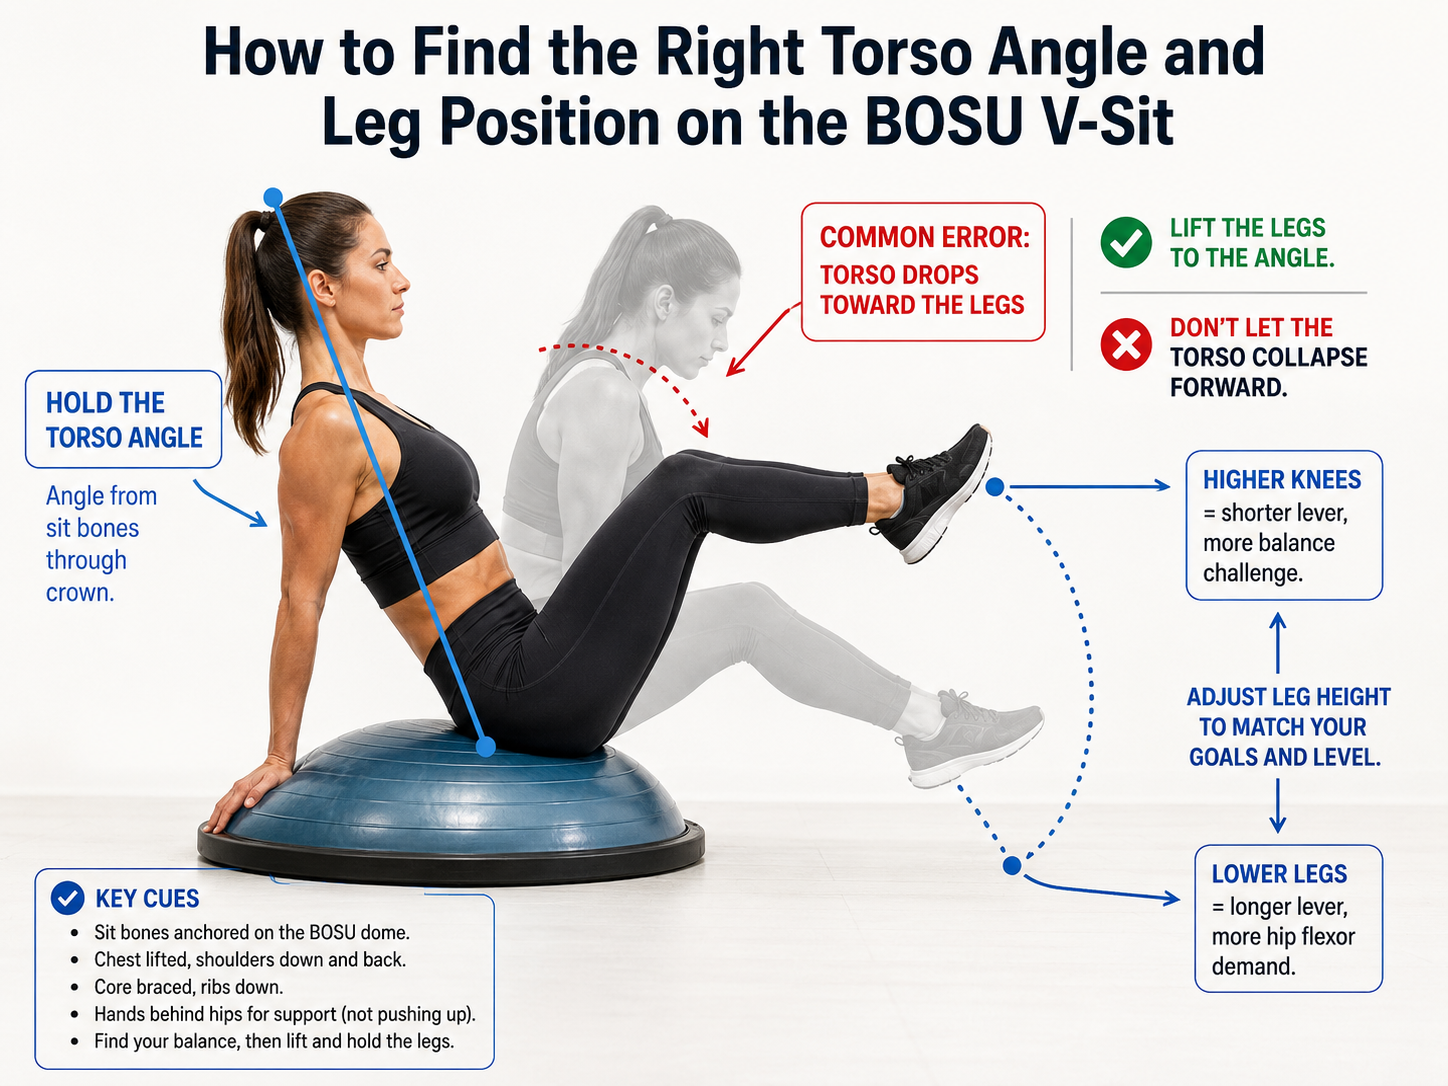
Hold. The exercise is the hold. Breathe. Maintain the torso angle. Resist the dome’s tendency to shift you sideways or roll you backward. When you lose form — when the lower back rounds, the torso collapses, or you stop breathing — set your feet down. The exercise is done when form is done, not when a timer expires.
Six BOSU V-Sit Progressions from Feet on Floor to Loaded Rotation
Each step adds one variable. Stay at each step until you can hold it for 20–30 seconds with stable form and steady breathing before moving to the next.
Step 1 — Seated balance, feet on floor. Sit on the dome, hands behind you, feet planted. No V-sit yet. Just learn to balance on the dome and find your seat position. This is where you discover that the dome moves and that your trunk has to respond.
Step 2 — One leg lifted, hands supported. Lift one foot off the floor while keeping both hands on the dome behind you. Three points of contact remain. This introduces the V-sit demand on one side while the other foot and both hands stabilize you. Alternate legs.
Step 3 — Both legs lifted, hands behind for support. This is the basic BOSU V-sit. Both feet off the floor, knees bent, hands behind you on the dome. Two points of contact: your sit bones and your hands. The abdominals and hip flexors do the work; the hands help with balance.
Step 4 — Both legs lifted, hands free. Remove the hands from the dome and extend them forward alongside your knees or out to the sides. This is the first version that asks your trunk to handle the full balance demand without any hand support. The anti-rotation and anti-lateral-flexion demands tend to increase noticeably.
Step 5 — Adding rotation. Hold the hands-free V-sit and rotate your torso slowly from side to side. Keep the legs still and move only the upper body. This adds a rotational component that emphasizes the obliques while the rectus abdominis and hip flexors maintain the base position.
Step 6 — Adding load. Hold a dumbbell, medicine ball, or weight plate during the hold or during the rotation. Load increases the overall demand, particularly on the trunk and hip flexors. Start light — even five pounds changes the exercise meaningfully when you are balancing on a dome. A resistance band looped around the feet and held in the hands is another option — the band creates constant tension that the core must resist throughout the hold, and the tension increases as the band stretches, which adds a progressive element within a single set.

How to Structure a BOSU V-Sit Training Session
The progressions above tell you which version of the exercise to do. This section tells you how to organize the holds within a session.
Straight sets. The simplest approach: pick your current progression step, hold for 20–30 seconds, rest 30–60 seconds, repeat for 3–5 sets. This works well for Steps 1 through 4, where the goal is building consistent hold quality at a single difficulty level.
Pyramid holds. Start with a 15-second hold, rest 30 seconds, then hold for 20, then 25, then 30 seconds, then work back down — 25, 20, 15. One full pyramid is a session. This structure builds endurance through the ascending phase and reinforces form quality on the descending phase when fatigue is highest. It works well at Steps 3 through 5.
Timed intervals. For Steps 4 through 6, a work-rest interval of 20 seconds on, 20 seconds off for 6–8 rounds compresses a meaningful training stimulus into a short block. Reduce the work interval or increase rest if form deteriorates before the final round — the protocol serves the form, not the other way around.
Whichever format you use, the BOSU V-sit works best as one element within a core stability block rather than a standalone session. Two to three working sets of the BOSU V-sit followed by a complementary exercise — a Pallof press, a dead bug, or a bird dog — covers more of the stability spectrum than additional V-sit volume would.
Five BOSU V-Sit Form Errors and What Is Actually Going Wrong
Excessive lower-back rounding. This usually means you are sitting too far back on the dome, or your core is not yet strong enough to hold a neutral-to-slightly-flexed spine at the current leg position. Fix: shift forward on the dome and bend the knees more. Earn a straighter leg position over time.
Breath holding. Isometric holds invite breath holding because bracing and breathing feel like they compete. They do not have to. Fix: breathe in shallow, steady cycles. If you cannot breathe while holding the position, the position is too advanced — drop to the previous progression step.
Hip flexors burning while the abs feel quiet. The legs are staying up, but the torso is collapsing — the hip flexors are doing the work while the rectus abdominis may not be contributing enough to maintain the torso angle. Fix: shift your focus from keeping the legs up to maintaining your torso angle. Leg height is a consequence of a well-held torso position, not the goal itself.
Launching into the V. Using momentum to throw yourself into the position rather than building it deliberately. This skips the setup that makes the exercise work and usually lands you in the wrong spot on the dome. Fix: follow the sequence — sit, set the spine, brace, lift one leg, then the other.
Chin jutting forward. The neck strains to compensate for a collapsing torso. Fix: keep a long spine from tailbone to crown. Think of your head as the top of the stack, not something leading the way forward.
When to Use the BOSU V-Sit — and When to Skip It
The BOSU V-sit is not a beginner core exercise. It layers a balance challenge on top of an already intermediate isometric hold. If the floor V-sit with bent knees is not yet stable for at least 15–20 seconds with good form, the BOSU version will not fix the underlying issue — it will amplify it. Build the floor hold first.
People with low back pain that worsens with trunk flexion should consult a qualified professional before attempting the BOSU V-sit. The exercise places the lumbar spine in sustained flexion under load, and the dome’s instability adds unpredictable micro-movements the spine must absorb. This is not inherently dangerous, but it is not the right starting point for a back that is currently aggravated by flexion.
People with tight or overactive hip flexors may find the BOSU V-sit reinforces the pattern they are trying to correct. The exercise demands sustained hip flexor contraction. If your training goal is to reduce hip flexor dominance — not strengthen it — this exercise may work against that goal. People with active anterior hip pain, hip flexor tendinopathy, or hip impingement should avoid sustained hip flexion holds until cleared by a professional.
Sustained bracing during isometric holds can elevate blood pressure, particularly if breath is held. People with uncontrolled hypertension or a history of exertional dizziness should get medical clearance before training isometric holds on an unstable surface.
The exercise creates sustained intra-abdominal pressure. People with a known hernia, significant diastasis recti, who are pregnant or early postpartum, or who have had recent abdominal surgery should consult a qualified professional before attempting the BOSU V-sit.
The BOSU V-sit fits well in a core stability block for people who already have a solid floor V-sit hold and want to add a proprioceptive and balance challenge. It pairs well with exercises that train the core in extension and rotation — the BOSU V-sit covers anti-extension and anti-lateral-flexion, so programming it alongside exercises like Pallof presses or bird dogs creates a more complete stability picture.
Two to three sessions per week is a reasonable starting frequency. The exercise is isometric and does not create the same recovery demand as heavy loaded movements, but the balance and coordination demands can be fatiguing, so recovery days between sessions are useful. If you are using the BOSU V-sit within a broader training program, a simple monthly structure works well: three weeks of progressive difficulty (moving through progression steps, adding hold time, or increasing load) followed by one easier week where you drop back a step or reduce volume. This can help prevent the staleness that comes from grinding the same hold at the same difficulty indefinitely.
Place the BOSU on a non-slip surface. Clear space around it. If you are working through the loaded progressions, start with less weight than you think you need — the balance variable changes the demand more than the load does.
Quick Reference — BOSU V-Sit Setup Checklist
Dome: dome side up, on a non-slip surface, space cleared around it.
Seat position: sit bones over or just forward of the bullseye — not on the tailbone.
Sequence: sit → set spine (slight lean back, abs engaged) → brace (breathe into it) → lift one leg → lift second leg.
Legs: start bent. Earn straight. Higher knees = more balance challenge. Lower legs = more hip flexor demand.
Hands: start behind you on the dome. Remove them only when the supported hold is solid for 20–30 seconds.
Breathing: inhale by expanding the lower ribs sideways (3–4 seconds), exhale by drawing the ribs back together (3–4 seconds). Core tension stays through both phases. If you cannot breathe, the progression is too advanced.
Session structure: 3–5 straight sets of 20–30 second holds with 30–60 seconds rest, or one pyramid (15→20→25→30→25→20→15 seconds), or 6–8 intervals of 20 seconds on / 20 seconds off. Two to three sessions per week.
When to stop the set: when your lower back rounds, your torso collapses toward your legs, or you stop breathing. Form ends the set, not time.