The Physics of “Tech Neck”
Your head is a heavy object. It weighs roughly 10 to 12 pounds, about the size of a bowling ball. When your ears align perfectly over your shoulders, your cervical spine handles that weight effortlessly. The skeletal structure bears the load, allowing the surrounding muscles to relax.
But as your head tilts forward to look at a phone or monitor, the physics change dramatically. According to biomechanical modeling, tilting your head forward just 15 degrees increases the relative weight on your spine to 27 pounds. At a steep 60-degree downward angle—the classic smartphone posture—your neck muscles are fighting an exhausting 60-pound load.
When muscles are forced to hold that kind of tension without a break, blood flow restricts. This causes localized ischemia (a lack of adequate blood supply) and an accumulation of metabolic byproducts in the tissue. You get that familiar, burning ache between your shoulder blades, the inability to easily check your blind spot in the car, and the nagging tension headache at the base of your skull.
If your neck constantly aches, you likely blame yourself. You tell yourself to sit up straight, you try to pull your shoulders back, and you inevitably end up slouching again five minutes later. The cycle repeats, the pain deepens, and the frustration grows.
Let go of the guilt. The modern environment—laptops, steering wheels, smartphones, and office chairs—is mechanically designed to pull your body forward.
This hub is not a 45-minute clinical physical therapy manual that requires a yoga mat and specialized equipment. It is a triage manual for the real world. We are going to use targeted neck exercises to immediately relieve acute pain, reverse the structural damage of “tech neck,” and build an upper spine resilient enough to handle your daily life.
Navigate to the section that solves your immediate problem.
The Diagnostics: What Kind of Pain Do You Have?
Medical Disclaimer: The exercises in this guide are designed for muscular tension and postural correction. They are not a substitute for medical advice. If you experience radiating pain, numbness, tingling down your arms, or sudden weakness, stop immediately and consult a healthcare professional, as these may indicate cervical disc or nerve involvement rather than simple muscular dysfunction.
Before you start stretching randomly, you need to identify what is actually hurting. Stretching the wrong muscle can exacerbate a spasm. Use this diagnostic table to find your starting point.
| Symptom / Sensation | Common Culprit | Action Plan |
| Dull, burning ache between the shoulder blades and lower neck. | Exhausted Lower Trapezius / Rhomboids | Skip to Phase 3: Armor. These muscles don’t need stretching; they are already overstretched. They need strengthening. |
| Stiff neck, cannot turn head to look over one shoulder. | Levator Scapulae spasm | Start at Phase 1: Triage. Gentle release and heat. Do not force rotation. |
| Headache wrapping from the base of the skull behind the eyes.* | Suboccipital tension | Start at Phase 1: Triage with the Suboccipital Release. |
| Deep ache in the front of the neck, jaw tension, forward head posture. | Tight Scalenes and SCM | Start at Phase 2: Reversal. Focus on anterior stretching and deep cervical flexion. |
*Note: Cervicogenic headaches, vertebral artery issues, and occipital neuralgia can present identically to suboccipital tension. If headaches are severe or persistent, seek professional evaluation.
Phase 1: Triage (For Acute Pain and Stiffness)
When you are actively in pain, your muscles are locked in a defensive spasm. Stretching aggressively right now will only cause the nervous system to panic and tighten those muscles further. The goal here is micro-movement to restore blood flow and coax the nervous system into letting go.
1. The Trap Drop (Nervous System Down-Regulation)
Most people carry their stress by unconsciously hiking their shoulders. You cannot relieve neck tension if your upper trapezius muscles are actively contracted. This exercise bridges breathwork with physical release.
-
The Setup: Sit on the edge of your chair with your feet flat on the floor. Rest your hands open on your thighs.
-
The Movement: Take a deep, slow breath in through your nose, allowing your shoulders to rise naturally. As you exhale forcefully through your mouth, actively drive your shoulders down toward the floor. Imagine trying to put your shoulder blades into your back pockets.
-
What You Should Feel: A sudden sense of space between your ears and your shoulders. The thick muscles running from your neck to your shoulder joint should feel instantly slack.
-
Troubleshooting: If you feel your lower back arching, you are pushing your chest out instead of dropping your shoulders. Keep your ribcage pulled down and braced.
-
Protocol: Perform 5 to 8 slow repetitions. Do this before attempting any other stretch in this guide.
2. The Suboccipital Release
The suboccipital muscles are a cluster of four tiny, critical muscles exactly where the back of your skull meets your neck. When you stare at a screen, these muscles lock up to keep your eyes level, triggering severe tension headaches.
-
The Setup: Lie flat on your back on a firm surface (the floor, not a bed). Take a tennis ball, a lacrosse ball, or your two thumbs, and place the pressure point directly under the bony ridge at the back of your skull.
-
The Movement: Do not aggressively roll the ball. Simply let the heavy weight of your head sink into the pressure point. Close your eyes. Make millimeter-sized “yes” and “no” nods.
-
What You Should Feel: A deep, intense, but relieving pressure—often described as a “hurts so good” sensation. You may feel a slight referral sensation radiating toward your ears or eyes.
-
Troubleshooting: If the pressure causes a throbbing, heartbeat-like sensation or makes your headache instantly worse, you are pressing too hard. Ease off entirely and use a softer object, like a rolled-up hand towel.
-
Protocol: Sustain the pressure for 2 to 3 minutes.
3. The Anchored Scalene Stretch
The scalenes run down the front and sides of your neck, connecting to your top two ribs. When they tighten from shallow chest-breathing and poor posture, they literally pull your head forward and down.
-
The Setup: Sit up straight in a sturdy chair. Take your right hand and physically sit on it, palm up. This “anchors” your right shoulder and collarbone, preventing them from rising up during the stretch.
-
The Movement: Gently drop your left ear toward your left shoulder. Do not pull with your left hand; let gravity do the work. For a slightly deeper, more targeted release, angle your chin up toward the ceiling by about one inch.
-
What You Should Feel: A clear, wrapping stretch starting from behind your right ear, traveling down the side of your throat, and ending at your collarbone.
-
Troubleshooting: If you feel a pinching sensation on the left side of your neck (the side you are leaning toward), back out of the stretch. You are compressing the joint. Re-align your head slightly forward before tilting.
-
Protocol: Hold for 30 to 45 seconds, breathing deeply into your stomach. Slowly return your head to the center before releasing your anchored hand. Switch sides.
4. The Levator Scapulae Release (The “Smell Your Armpit” Stretch)
The levator scapulae is the muscle responsible for the classic “I slept on my neck wrong” feeling. It connects the upper cervical spine to the top corner of your shoulder blade.
-
The Setup: Sit upright. Raise your right arm and place your right hand flat behind your head, near the crown.
-
The Movement: Turn your head 45 degrees to the right, and then gently pull your chin down toward your right armpit.
-
What You Should Feel: A distinct, pulling stretch running from the base of your skull, down the back of your neck, and directly into the top inside corner of your shoulder blade.
-
Troubleshooting: Never force this stretch. The levator muscle is highly reactive. If it spasms, use heat for 10 minutes before trying this stretch again.
-
Protocol: Hold for 20 seconds. Repeat 2 times per side.
Phase 2: Reversal (Fixing “Tech Neck”)
Once the acute, sharp pain is gone, you must address the structural adaptation that caused it. If you are developing a slight “hump” at the base of your neck, it is because the lower neck is flexing heavily forward while the upper neck hinges backward so you can keep your eyes on your screen. These specific neck exercises reboot your skeletal alignment.
1. The Floor Chin Tuck (Deep Cervical Flexion)
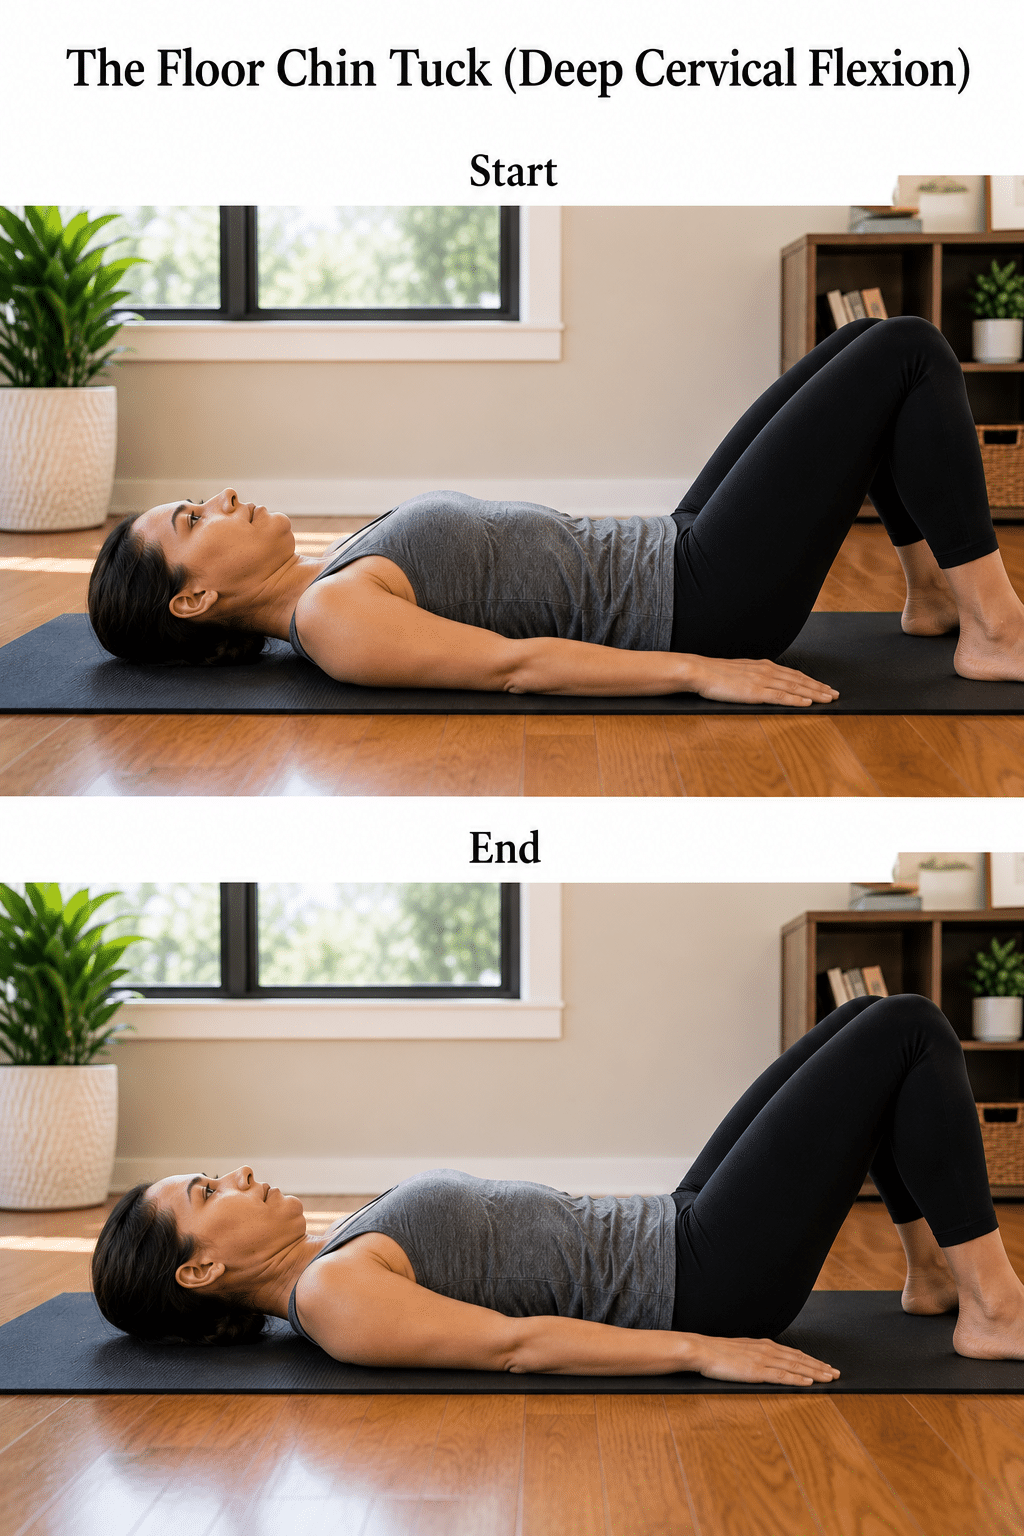
Standing chin tucks are easily done incorrectly because your body can compensate by leaning backward. Doing them on the floor forces you to fight gravity and guarantees your spine remains completely neutral.
-
Contraindications: Avoid this movement if you have a known cervical disc herniation, cervical stenosis, or acute radiculopathy, as forced cervical flexion can exacerbate nerve compression.
-
The Setup: Lie flat on your back on the floor without a pillow. Stare directly up at the ceiling. Relax your shoulders completely.
-
The Movement: Without lifting the back of your head off the floor, gently press your skull downward into the ground while simultaneously pulling your chin tightly down toward your Adam’s apple. Imagine you are trying to give yourself a massive double chin.
-
What You Should Feel: You should feel the tiny, deep muscles in the front of your throat working hard, accompanied by a gentle lengthening stretch running up the back of your neck.
-
Common Mistake: Lifting the head off the floor or pressing the lower back into the ground. The movement should be entirely isolated to the neck and upper throat.
-
Protocol: Hold the tucked position for 5 solid seconds. Release slowly. Repeat for 15 repetitions.
2. Wall Angels (Scapular Retraction)
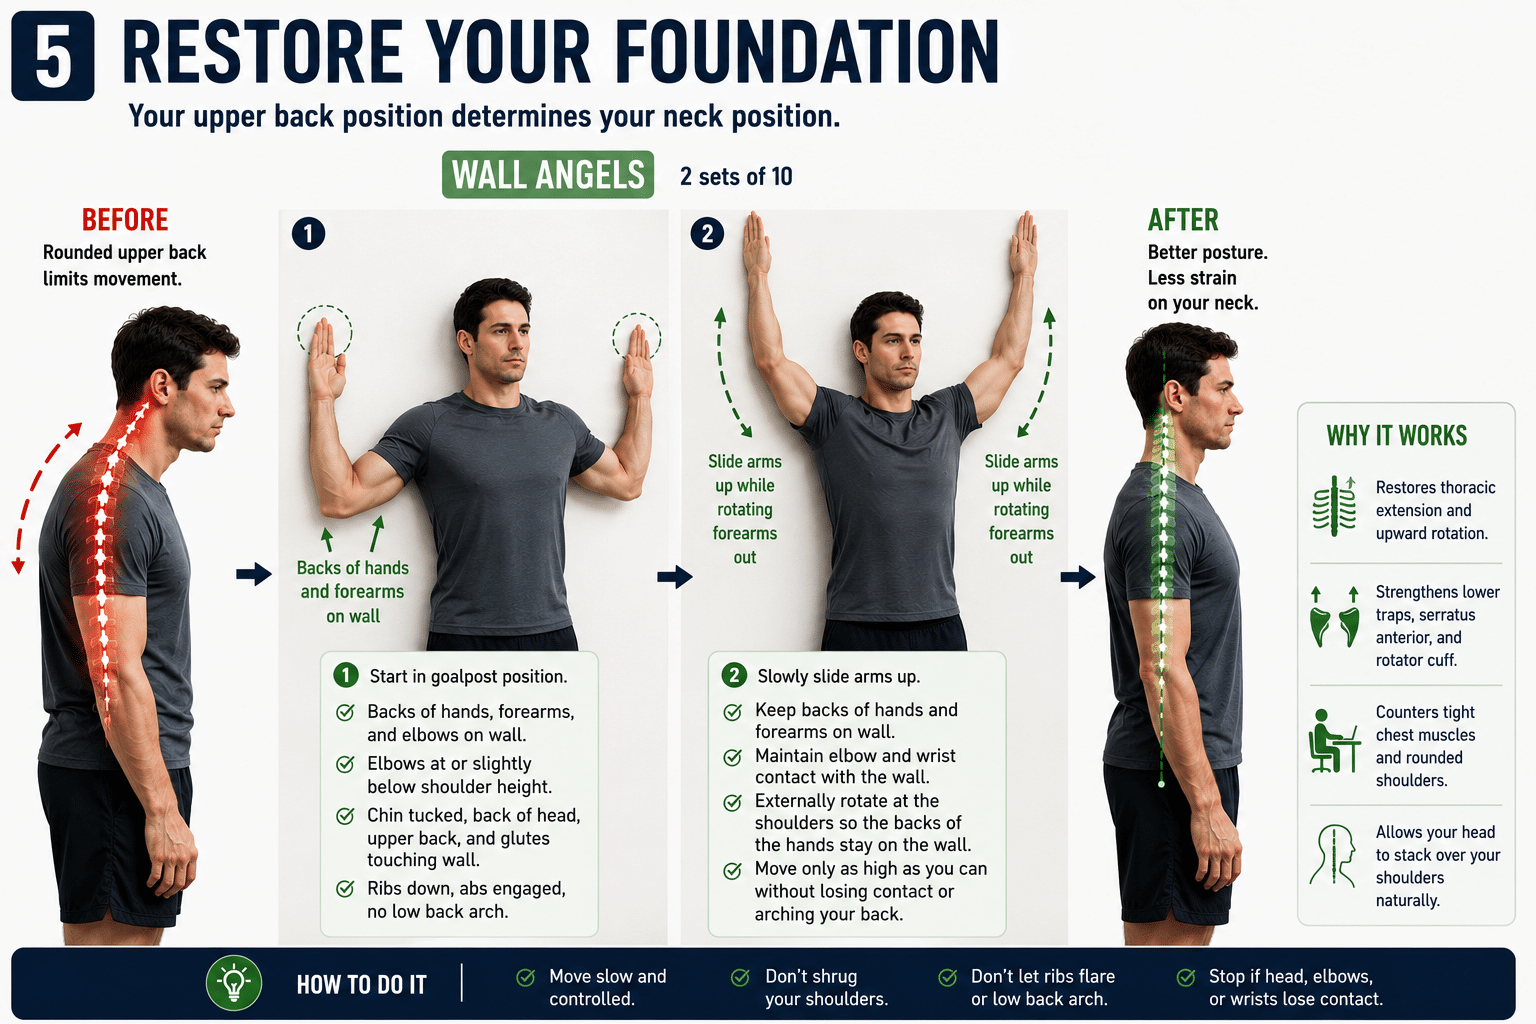
Your neck sits on the foundation of your upper thoracic spine. If your shoulders are permanently rounded forward, your neck has no choice but to jut forward to compensate. You cannot fix your neck without fixing your upper back.
-
The Setup: Stand up and place your heels, glutes, upper back, and the back of your head completely flat against a blank wall. Raise your arms into a “goalpost” or “cactus” position, pressing your elbows and the backs of your hands firmly into the wall.
-
The Movement: Slowly slide your hands up the wall into a “Y” shape over your head, then pull them back down to the goalpost position.
-
What You Should Feel: Intense fatigue and muscular burning in the mid-back, specifically between your shoulder blades.
-
Troubleshooting: If your lower back peels off the wall as you reach up, stop. Only slide your hands as high as you can while keeping your entire spine and ribcage pinned against the drywall. If you cannot get your hands flat against the wall in the starting position, step your feet a few inches away from the wall to give yourself a better angle.
-
Protocol: 10 to 12 slow, controlled repetitions.
3. Passive Thoracic Extension
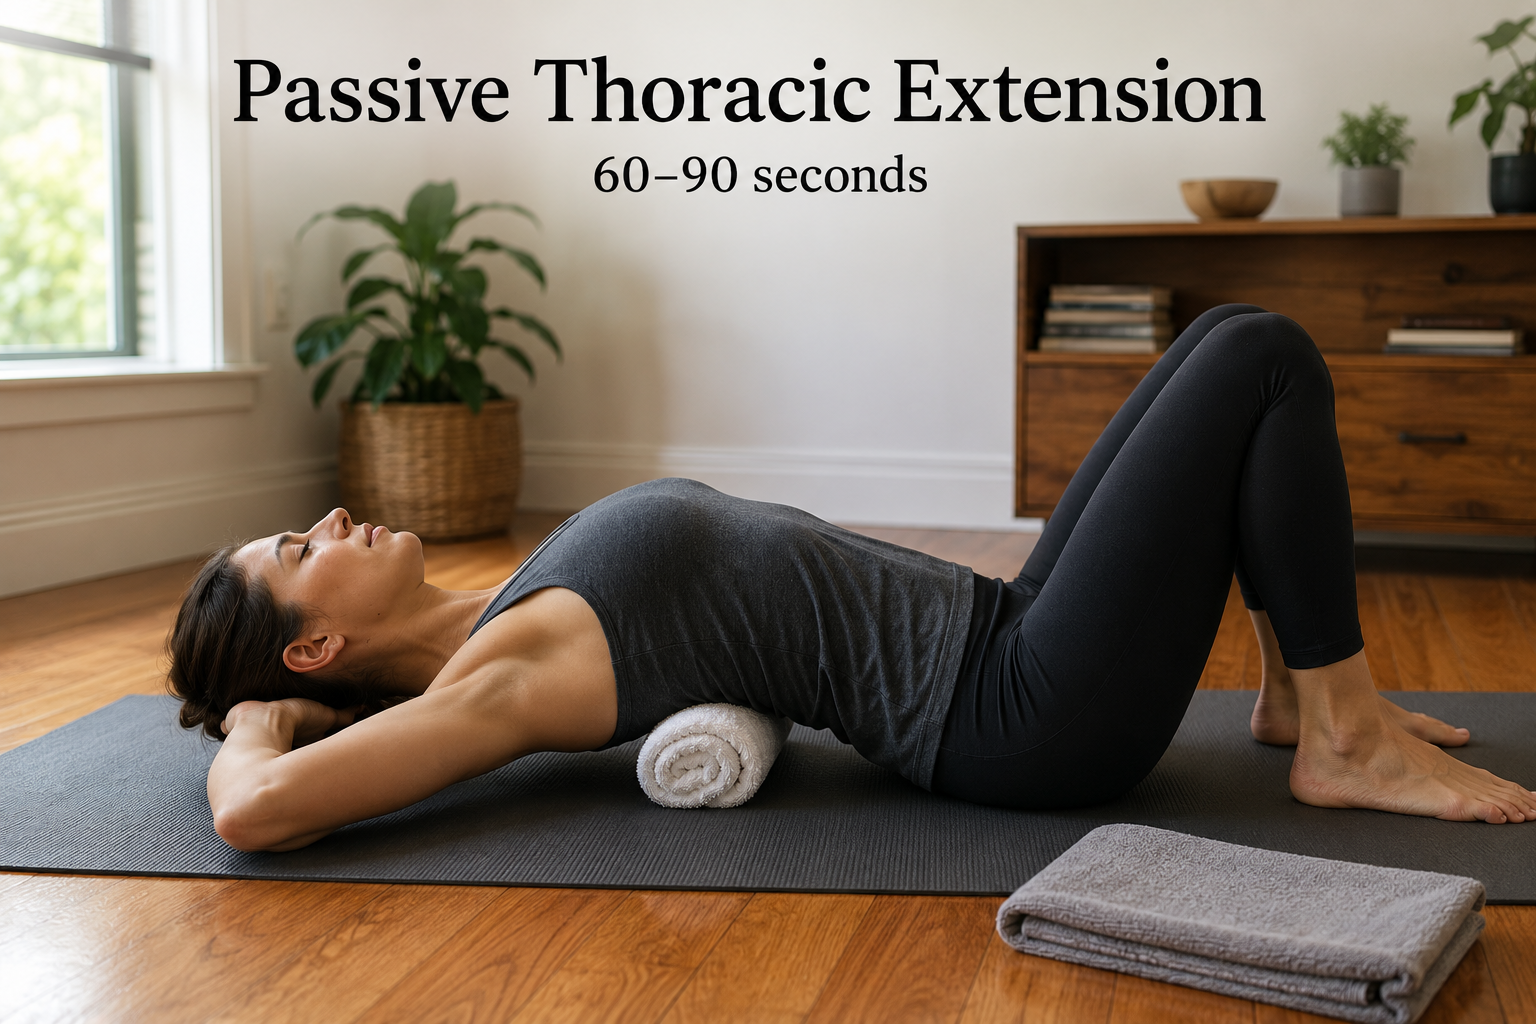
The thoracic spine (your mid-back) is designed to extend backward and rotate. When we sit all day, it gets locked in a rounded, forward-flexed position. Unlocking the mid-back removes the immense pressure placed on the lower neck.
-
Contraindications: Proceed with caution or avoid this movement entirely if you have acute spinal stenosis or active radiculopathy.
-
The Setup: Take a standard bath towel and fold it in half, then roll it up tightly into a dense cylinder. Lie on your back on the floor and place the towel horizontally across your spine, resting exactly between your shoulder blades.
-
The Movement: Support the weight of your head with your hands (fingers interlaced behind your skull). Gently lean your upper back and head backward over the towel roll, allowing your elbows to fall open toward the floor.
-
What You Should Feel: A deep, opening stretch across your chest and a release of pressure in the mid-back joints.
-
Protocol: Rest in this extended position for 60 to 90 seconds. Breathe deeply into your chest to expand the ribcage.
Phase 3: Armor (Building Resilience)
Stretching provides temporary relief; strengthening provides a permanent cure. A strong neck is a resilient neck that can handle the demands of a desk job, driving, and physical activity without going into spasm.
If you want to dive deeper into the exact biomechanics of how these muscular networks stabilize your spine and protect your nervous system, the Cleveland Clinic’s anatomical guide to the cervical spine provides excellent, medically vetted context.
1. 4-Way Isometric Holds
Isometrics are the safest way to build neck strength. An isometric exercise involves contracting the muscles without actually moving the joint. This allows you to build significant strength and stability without grinding the delicate cervical vertebrae or risking a pinched nerve.
The Setup: Sit perfectly upright in a chair. Pull your head slightly back so your ears are over your shoulders. You will use your own hands to provide the resistance.
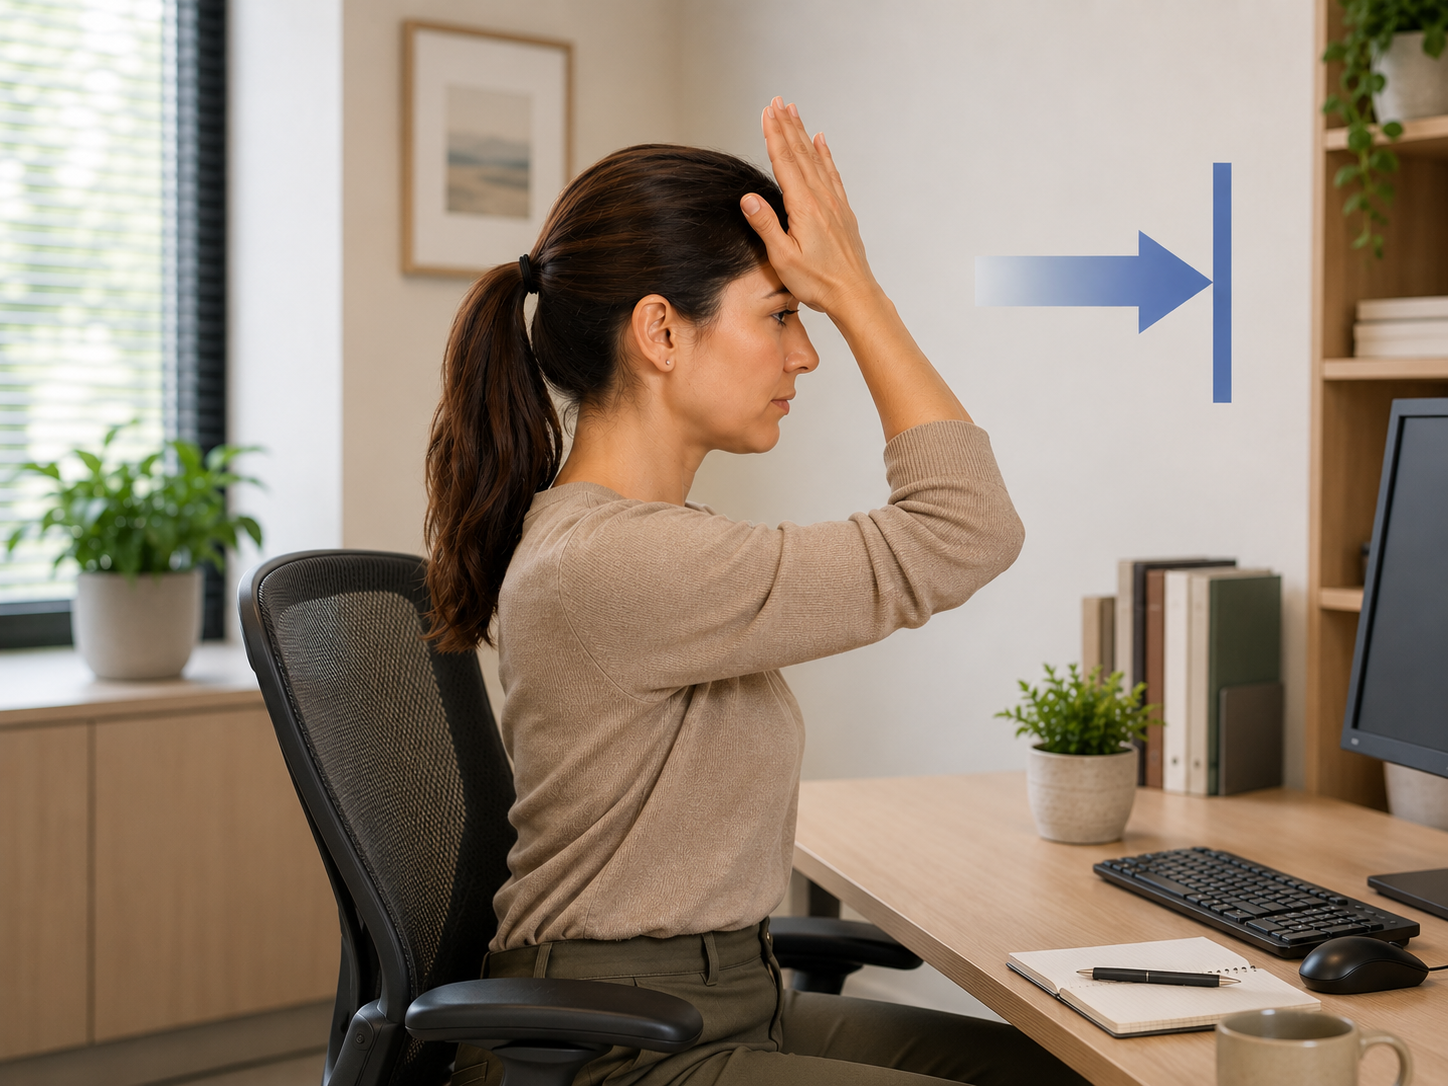
Front (Flexors): Place the heel of both hands against your forehead. Push your head into your hands with about 30% of your maximum effort, while pushing back with your hand. Match the pressure exactly so your head does not move at all. Hold for 5 seconds.
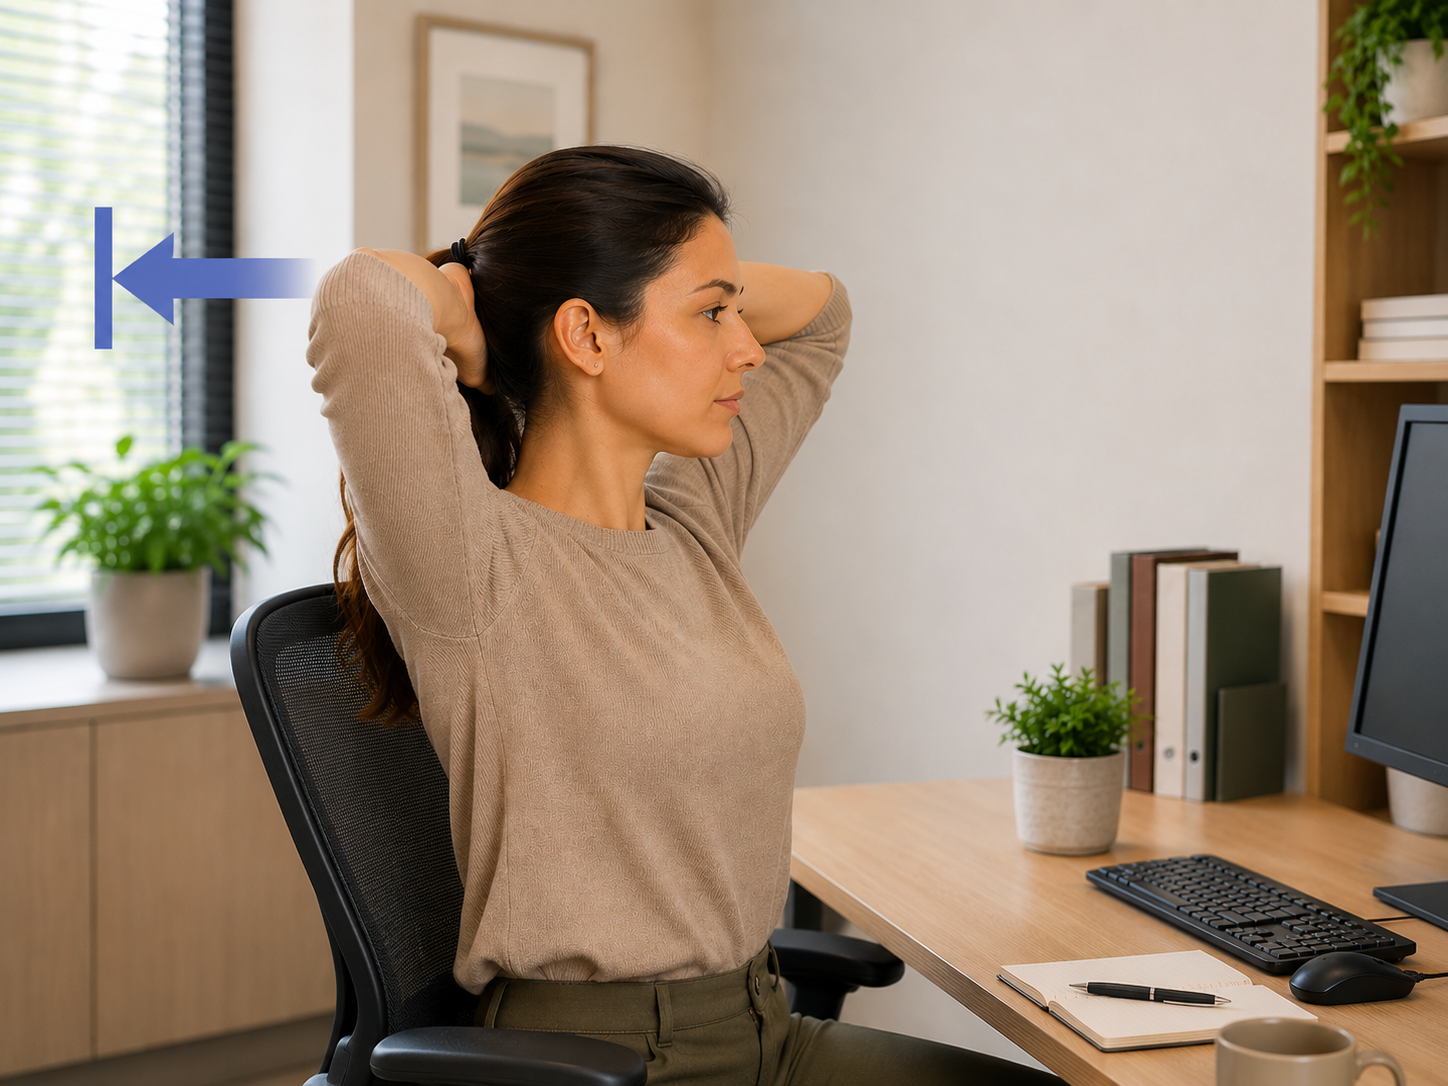
Back (Extensors): Interlace both hands behind the back of your head. Press your head straight backward into your hands (do not tilt your chin up). Hold for 5 seconds.
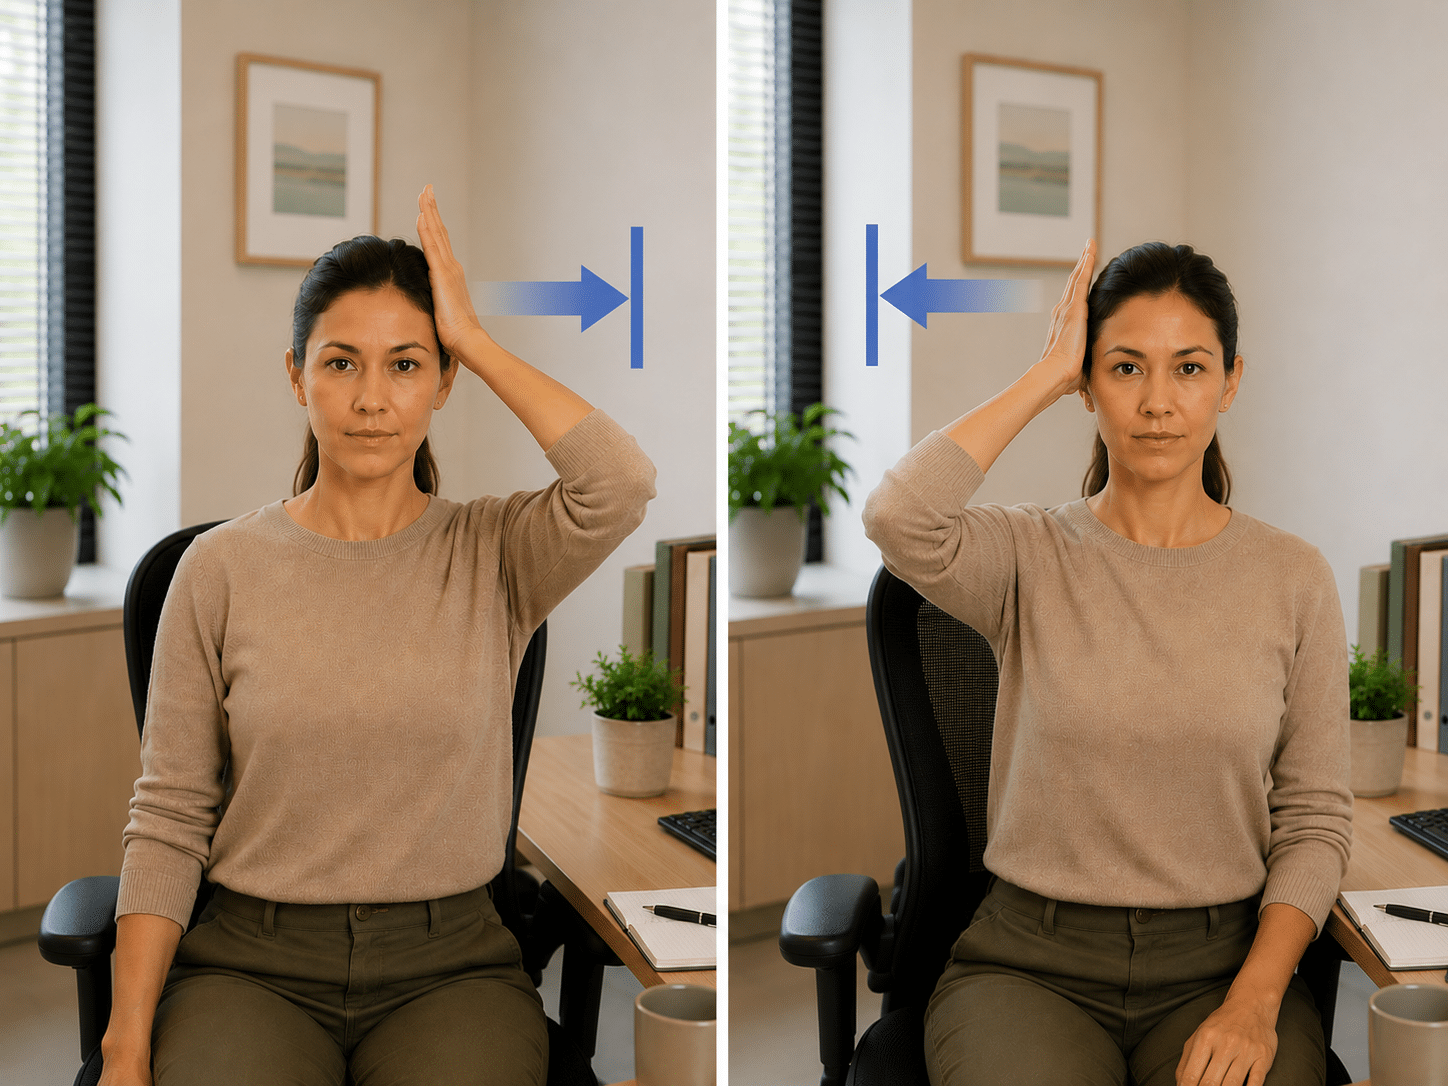
Sides (Lateral Flexors): Place your right hand flat against the side of your head, just above the ear. Try to tilt your head to the right, while your hand acts as an immovable brick wall. Hold for 5 seconds. Switch and repeat on the left side.
Protocol: Complete this entire 4-way circuit 3 to 4 times.
2. The Prone Cobra
This floor movement is the ultimate antidote to the desk-worker posture. It strengthens the entire posterior chain—the network of muscles running down the back of your body—effectively locking your newly aligned neck into place.
-
The Setup: Lie face down on the floor. Place your arms down at your sides, with your palms facing the floor.
-
The Movement: Squeeze your shoulder blades together aggressively. Using your mid-back muscles, lift your chest, arms, and head two inches off the floor.
-
The Golden Rule: Keep your chin tucked. Do not look up at the ceiling or the wall in front of you. Your gaze should remain locked on the floor directly beneath your nose. Looking up hyperextends the neck and ruins the exercise.
-
What You Should Feel: A strong muscular contraction running from the base of your skull all the way down to your lower back.
-
Protocol: Hold the lifted position for 10 to 15 seconds. Lower down slowly. Repeat 4 times.
3. Prone Y-Raises (Activating the Lower Trapezius)
People often try to massage their upper neck and shoulders when they ache, but the real issue is usually profound weakness in the lower trapezius—the muscles that sit beneath your shoulder blades. When these are weak, the upper neck muscles have to do all the work.
-
The Setup: Lie face down on the floor with your arms extended up at a 45-degree angle (creating a “Y” shape with your body). Point your thumbs up toward the ceiling.
-
The Movement: Keeping your chin tucked and your forehead resting on the floor, squeeze your shoulder blades down and together to lift your arms a few inches off the floor.
-
What You Should Feel: A deep contraction in the middle of your back, well below your neck.
-
Troubleshooting: Do not let your shoulders shrug up toward your ears as you lift your arms. If they do, your overactive upper trapezius is hijacking the movement—the exact dysfunction we are trying to fix. Actively pull your shoulder blades down toward your back pockets as you lift.
-
Protocol: 3 sets of 10 to 12 repetitions. Pause for a full second at the top of each repetition.
Environmental Integration: The Stealth Routines
The fatal flaw of most physical therapy regimens is the setup time. You do not need a gym, a block of free time, or workout clothes to fix your neck. You simply need to weaponize the dead time in your daily routine. Here is how to integrate these neck exercises into your environment seamlessly.
The Commuter’s Reset (The Red Light Routine)
Perfect for sitting in traffic or at a long red light.
Car seats actually promote terrible posture, often pushing the head forward with an overly aggressive headrest. You can turn this into a strengthening tool.
-
Ensure your seat back is relatively upright, not reclined.
-
Pull your chin straight back (the Chin Tuck movement).
-
Press the back of your head firmly into the car’s headrest with about 40% of your maximum effort.
-
Hold for 5 to 10 seconds, keeping your eyes on the road.
-
Release and repeat 3 times before the light turns green.
Result: You are actively strengthening your cervical extensors while driving.
The Desk Worker’s Stealth Stretch (The Zoom Routine)
Perfect for releasing tension during a long video call without drawing any attention to yourself.
You can completely reboot your upper body posture while the person on the screen has no idea you are exercising.
-
Slide to the front half of your office chair and plant your feet flat on the floor.
-
Let your hands drop to your lap out of frame.
-
Perform 5 slow Trap Drops, forcefully exhaling and pulling your shoulders down away from your ears.
-
Perform 3 subtle, seated Chin Tucks, pulling your head back over your spine.
-
Gently turn your head a few degrees left and right to encourage synovial fluid to lubricate the cervical joints.
The Morning Waker (The Shower Routine)
Perfect for the “I slept on it wrong” morning stiffness.
Do not stretch a cold, stiff neck. Let the environment do the warm-up for you.
-
Stand in a hot shower and let the water run directly over the base of your neck for 60 seconds. The heat causes vasodilation, increasing blood flow to the spasming muscles.
-
While the hot water is hitting your neck, perform the Anchored Scalene Stretch by gently tilting your head side to side.
-
Perform a few gentle shoulder rolls, rolling the shoulders backward (never forward).
Conclusion: Consistency Always Beats Intensity
When it comes to rehabilitating the cervical spine, less is more. The neck is a highly sensitive, neurologically dense area of the body. Forcing a stretch to the point of pain will only cause the muscles to lock up further in a protective mechanism.
You will experience vastly superior results by doing three minutes of these gentle neck exercises every single day than by attempting an aggressive, painful 45-minute stretching session once a week. Your environment is constantly working to pull you out of alignment; your daily routine must include a counter-measure.
Bookmark this hub. You don’t need to do every exercise on this page today. Pick just one movement from the Triage section right now, execute it with perfect form, and start the process of unwinding the tension.